Chinese Button Knot | |
| Find the center of the cord and tie a constrictor knot at that point.You may use any sort of cord you wish. The knot will be removed later. |  |
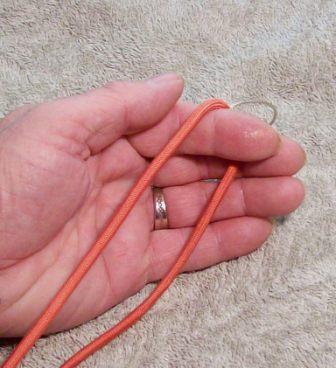
| Place the center of the cord over your index finger and place the constrictor knot towards the back. |  |
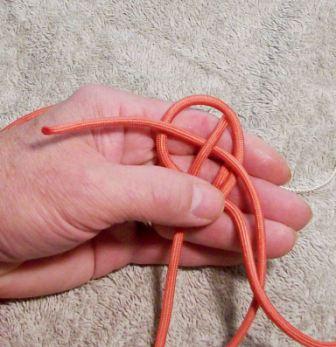
| Take the lower cord and twist it and lay it over the upper cord as shown. |  |
| Grasp the lower cord where it overlaps itself and twist it up and place it back on the upper cord. |  |
| Gently hold the loop in place with your thumb. |  |
| Bring the end of the cord that is hanging straight down, up under the cord that is pointing away from your thumb. |  |
| Take the end of this cord over the outer edge and under the center cord. |  |
| Continue by pulling the cord over the outer loop and out to the side of your hand. |  |
| Pull the cord all the way through the loop and snug it down so it is over your index finger as show. |  |
| You now have a diamond shaped box in the center of your knot.Grasp the end of the cord that is hanging down from the knot and bring it up through the center of the diamond. |  |
| Pull the cord through until it is just almost snug. |  |
| Take the end of the cord that is going off over the top of your hand and bring it up through the center of the diamond |  |
| It is not very obvious, but you can follow the two strands up to where they make a Y and you can see that there is a cord on either side of the cord going down through the center of the Y. |  |
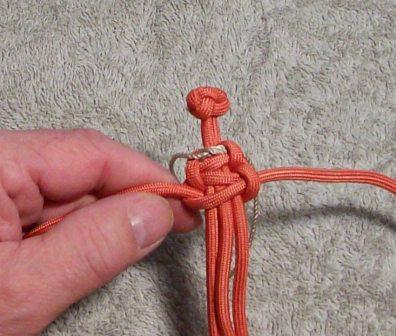
| This is where we begin to tighten the knot into a button.Keep pulling on the constrictor knot to keep it in the center of the knot. Then gently start adjusting the cords until they are progressively tighter. |  |
| Keep making the adjustments until the knot is as tight as possible. Keeping the constrictor knot in the top center. |  |
| I use a fid and a pair of pliers to get the knot tight. |  |
| Once you have the knot as tight as you can get it you can remove the constrictor knot.I use the little pointy scissors my wife uses when she does her cross-stitching to cut the cord. |  |
Uses for Paracord - Reviews, Instructions and Questions
Friday, 7 February 2014
How to Make Chinese Button Knot?
Tuesday, 4 February 2014
How to Use Paracord in Military and Civilian Situations?
What is Parachute cord?
I thought it would nice to give some background information on what paracord is. I thought about looking across the internet and trying to write my own description, but that was going to take too long and the outcome probably wouldn’t be as nice. So…I headed over to wikipedia.org and typed in paracord. Here is the link and information that present on their page. For my quick 2 cent version. Buy the 550 paracord that is made in the USA and has seven strands and purchase it from a place other that a giant retailer.
Parachute cord
The sheath of this commercial parachute cord is braided from 32 strands and the core made up of seven two-ply yarns. The scale is in inches.
Parachute cord (also paracord or 550 cord) is a lightweight nylon kernmantle rope originally used in the suspension lines of US parachutes during World War II. Once in the field, paratroopers found this cord useful for many other tasks. It is now used as a general purpose utility cord by both military personnel and civilians. This versatile cord was even used by astronauts during STS-82, the second Space Shuttle mission to repair theHubble Space Telescope.The braided sheath has a high number of interwoven strands for its size, giving it a relatively smooth texture. The all-nylon construction makes paracord fairly elastic; depending on the application this can be either an asset or a liability.
Military usage
When threaded with beads, paracord may be used as a pace counter to estimate ground covered by foot. The yarns of the core (commonly referred to as “the guts”) can also be removed when finer string is needed, for instance as sewing thread to repair gear or fishing line in a survivalsituation. The nylon sheath is often used alone, the yarn in the core removed, when a thinner or less elastic cord is needed. Ends of the cord are almost always melted and crimped to prevent fraying.
In addition to purely utility functions, paracord can be used to fashion knotted or braided bracelets, lanyards, belts, and other decorative items. 550 Cord is used by many US military members as a bracelet signifying deployment to the Central Command Area of Responsibility, typically countries in the Middle East. It is also worn in remembrance of POW/MIA service members during National conflict. It is fashioned by using three equal lengths of cord and weaving them together to make a bracelet that is then secured with a looped end and a button from the Desert Camouflage Uniform. The bracelet is commonly seen among those serving in the Middle East.
Types
The US military specification for paracord outlines a number of parameters to which the final product must conform. Although it contains specific denier figures for the sheath strands and inner yarns, there are no overall diameter requirements for the cord itself. Below is a table of selected elements from the specification.
| Type | Minimum breaking strength | Minimum elongation | Minimum length per pound | Core yarns | Sheath structure |
|---|---|---|---|---|---|
| I | 95 lb (43 kg) | 30% | 950 ft (290 m; 1.57 g/m) | 4 to 7 | 32/1 or 16/2 |
| IA | 100 lb (45 kg) | 30% | 1050 ft (320 m; 1.42 g/m) | <no core> | 16/1 |
| II | 400 lb (181 kg) | 30% | 265 ft (81 m; 5.62 g/m) | 4 to 7 | 32/1 or 36/1 |
| IIA | 225 lb (102 kg) | 30% | 495 ft (151 m; 3.00 g/m) | <no core> | 32/1 or 36/1 |
| III | 550 lb (249 kg) | 30% | 225 ft (69 m; 6.61 g/m) | 7 to 9 | 32/1 or 36/1 |
| IV | 750 lb (340 kg) | 30% | 165 ft (50 m; 9.02 g/m) | 11 | 32/1, 36/1, or 44/1 |
Civilian availability
Paracord has also been used by many since the 1970s for whipmaking. The durability & versatility of this material has proved beneficial for performing whip crackers & enthusiasts. Since nylon doesn’t rot or mildew, it has become known as an all-weather material for whipmaking. Nylon whips have grown in popularity over the last few decades, more so in the last several years.
The Wonderful Colors of Paracord
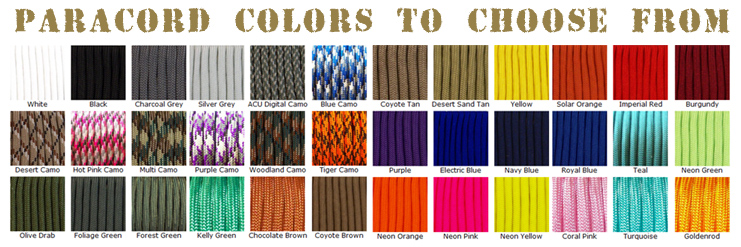
For today’s post I thought I would show you the wide variety of colors that paracord comes in. There seems to be just about any color that you could imagine or at least one that will fit your needs. Remember that the color of your project with greatly affect the outcome and how much you or other people like it.The image below is just a sampling of the different colors to choose from.
Example 1: My current BOB (Bug Out Bag) is completely black. It has somewhere around 15 zipper pulls. They were just simple cheap single cord pulled through and tied in knot. They were sufficient, but I thought I would use paracord and construct some sturdier pulls and have some extra paracord on hand. Each zipper pull has around 2′ of cord and if you multiple that by 15 I have 30′ feet of cord just in my zipper pulls. I know that its not all once piece, but in a pinch.
Example 2: Inside my BOB I have fire making tools and so I have constructed a simple loop made out of bright orange paracord, just in case I drop them in some high grass or in the dirt. The high orange allows me to find it much easier.
Example 3: I wanted my family to start wearing a paracord bracelet and too get them more in the mindset I made some bracelets with their 2 favorite colors.
I’m hoping that this will get you thinking about choosing the right color for the job and my goal is to start posting pics of things that I make and some instructions on how to make the.
 |
| Great Variety of Paracord Colors |
Example 1: My current BOB (Bug Out Bag) is completely black. It has somewhere around 15 zipper pulls. They were just simple cheap single cord pulled through and tied in knot. They were sufficient, but I thought I would use paracord and construct some sturdier pulls and have some extra paracord on hand. Each zipper pull has around 2′ of cord and if you multiple that by 15 I have 30′ feet of cord just in my zipper pulls. I know that its not all once piece, but in a pinch.
Example 2: Inside my BOB I have fire making tools and so I have constructed a simple loop made out of bright orange paracord, just in case I drop them in some high grass or in the dirt. The high orange allows me to find it much easier.
Example 3: I wanted my family to start wearing a paracord bracelet and too get them more in the mindset I made some bracelets with their 2 favorite colors.
I’m hoping that this will get you thinking about choosing the right color for the job and my goal is to start posting pics of things that I make and some instructions on how to make the.
Monday, 3 February 2014
What Colors of Paracord are Available?
Parachute Cord Colors Variety
|
Other colors available:
Black, White, OD, Royal Blue, Red, Orange, Kelly Green, Purple, Woodland Camo, Desert Camo, Desert Tan, Coyote, Foliage, Neon Lime, Neon Lemon, Bright Yellow, Burgundy, Red/White/Blue,
Honky Tonk, Desert Foliage, Harmony, Creamsicle, Royal Mountain, Carolina Blue, OverKill, Stryper, Grapevine, Black Widow, Strawberry Fields yellow, acid goldenrod, acid electric blue, acid brown-gold, neon pink, acid walnut, acid might blue, acid garnet, foliage green, neon turquoise, colonial blue, emerald green, dark green, burgundy, acid dark brown, imperial red |
| Blue / White combo | |
 | OD / White combo |
 | Orange / White combo |
| Black / White combo | |
| Red / White / Blue | |
 | Red / White combo |
 | Desert Tan / Foliage combo |
| New color! Many combined colors (actual pattern may vary) | |
| Yellow and Black Combo | |
| Red and Black Combo | |
| Purple and Yellow Combo | |
 | Carolina Blue |
How to Make Survival Paracord Bracelet?
How to braid a Survival Bracelet
 | |
| To start cut and seal both ends of a twelve(12) foot length of paracord. |  |
| Measure the wrist and add an inch or so to the measurement. After you make a few you will get the hang of how much extra to use. | |
| Start your bracelet by tying a Chinese Button Knot at the center of the cord. |  |
| Measure the bracelet from the edge of the button knot and tie a Constrictor Knot at the correct length. |  |
| From this point fold the cords back along what will become the inner cords.Tie another constrictor knot and inch or so from this end. Just to remind the cord to stay in place for a while. |  |
| Smooth out the outer strands of cord along side the inner strands and tie another constrictor knot 3/8 to 1/2 inch from the button knot. |  |
| The constrictor knots will be removed later, they are just there to help hold thing in place for a while. |  |
| Grasp the cords just below the constrictor knot with one strand of cord going off each side.It doesn't make any difference which hand you use. |  |
| Make a small loop on the right side and take the cord behind the braid and hold it tight. |  |
| Bring the cord on the left side behind the cord you just brought over. |  |
| Take the end of the cord you brought behind and thread it through the loop on the right. |  |
| Pull the cord all the way through until it is almost snug. |  |
| Now Pull both cords so the knot is tight.It is important that you tighten all of the knots the same. |  |
| This time bring the cord on the right side over the top of the braid and out to the left. |  |
| Bring the left cord over the top of the cord you just brought across and then behind the braid. |  |
| Now insert this cord through the back of the loop on the right side. |  |
| Pull both cords snug. |  |
| Tighten the knot just as tight as you did the previous knot. |  |
| Bring the right cord behind the braid and up and over the left cord. |  |
| Bring the left cord over the top and through the loop on the right side and tighten the knot. |  |
| After you have tied two or three square knots you can remove the constrictor knot from the end by the button knot. |  |
| If you happen to forget which cord is supposed to go where, just look at the last knot that was tied.The cord that is coming out of the knot and pointing up is the cord that will be behind the braid. |  |
| To speed things up a bit, I like to bring the cord that is going through and out the back of the knot over the braid and behind the cord that is pointing up. |  |
| Now bring the cord that is pointing up over the cord you just brought across and behind the braid. |  |
| Now bring the end up through the loop on the left and tighten the knot.Be sure the tension is the same on all of the knots. |  |
| As you can see the cord on the left is now pointing up.Bring the cord on the right side of the braid over the top of the braid. |  |
| Bring the upper left cord over the cord you just brought across, behind the braid and up and through the loop on the right side of the braid. |  |
| Tighten the knot,again making the tension the same. |  |
| Continue to tie square knots until you get an inch or so from the constrictor knot. |  |
| At this point you need to remove the constrictor knot and align the loops. |  |
| Continue to tie square knots until you are at a point where the loops will just fit over the button knot at the other end of the braid. |  |
| At this point you can use a wood burning tool to cut and melt the ends of the cord next to the edge of the bracelet.You can use a lighter, but just be extremely careful. It is very easy to burn part of the bracelet that you don't want burned. |  |
| This is where I like to use a pair of hemostats or fine needle nose pliers to go under the knot at the end of the bracelet and grasp the cord. |  |
| Pull the end under the knot. |  |
| You want to be sure to pull the cord very tight. |  |
| Turn the braid over and do the same thing to the other side. |  |
| Again, you want to pull this under and pull it very tight. |  |
 | |
| I like to do this several times so there is no chance the cord will pull out. |  |
| At this point I saturate the cord with liquid glue. |  |
| Keep the cord away from the bracelet so the glue doesn't stick to any of the loops. |  |
| When the glue is dry, pull it through one more set of knots. |  |
| At this point I use a pair of side cutters to cut the cord through the glued area. |  |
| I then fold the bracelet and apply another drop or two of glue to the end to seal it so it doesn't come unraveled. |  |
| After the glue has dried do the same thing to the other side. |  |
| At this point you can move the knots so they cover the end of the cords. |  |
 | |
| To wear, bring the loop over the end of the button knot.If you need to use the parachute cord for an emergency, grasp the button knot and pull hard and the inner cords will pull through the knots. |  |
Subscribe to:
Comments (Atom)


